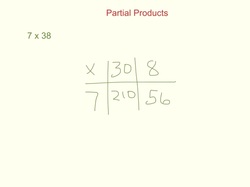
 Partial Products is a nice little method for multiplying large numbers. I recommend showing students how to do this method of multiplying before introducing them to the traditional algorithm - the way I learned to do it in school, which was the only method we were ever taught. To multiply 2-digit numbers, have kids begin by splitting up the numbers into expanded notation - hundreds, tens and ones. For example, to do 38 x 7, think of 38 as 30 and 8. Now multiply those numbers by 7. So, 30 x 7 = 210 and 8 x 7 = 56. 210 + 56 = 266, therefore 38 x 7 = 266. The picture above shows this thinking symbolically. 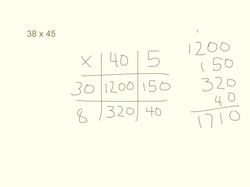 Use this method for larger numbers as well. 38 x 45 is 30 x 40, 30 x 5, 40 x 8 and 5 x 8. The picture at the left explains this thinking a bit more clearly. Once you have all the multiplication finished, just add the products together to get the final product of 38 x 45. To those of us who are used to multiplying with regrouping (carrying the tens, hundreds, etc) this sounds complicated, but kids will get the partial products method way faster than the traditional method. Once they understand how to multiply larger numbers, then definitely introduce the shortcut, which is the traditional algorithm, but don't introduce it too soon! If kids learn to do the steps of the traditional method before they understand why those steps work, we are setting them up for a lifetime of math phobia. Check out my YouTube video below for a full explanation of this method, as well as the Partial Quotients method of dividing large numbers, which I explain below. 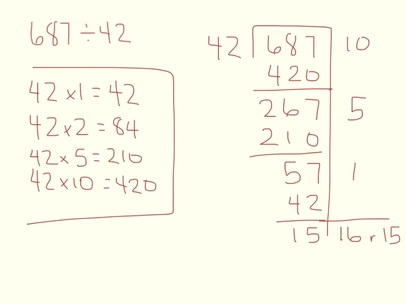 OK, now let's use this method of partial "answers" and apply it to division as an alternative to long division, which is a much hated concept across middle years students (at least, I hated it!).
To begin the Partial Quotients method of division, I like to start with a quick list of multiplication facts, which will lessen the mental load I'm carrying while I do the division. So if I'm dividing by 3, I make a list of the 3x facts that can help me - specifically, 3x1, 3x2, 3x5 and 3x10. The example in the picture above shows the facts of 42 that I can draw on to solve 687÷42. Next I think about how many groups of 42 I can take from 687. I use the facts I recorded to check. I see that I can take 10 groups away, so I record that, and take the 10 groups away. Now I still have 267, so I can take 5 groups of 42 away from that, which is 210. I still have 57, so I take one more group of 42 away and I have 15 left over. That means I have taken away 16 groups of 42 and there is a remainder of 15. Therefor, 687÷42=16 r15. Easy peasy. As I mentioned with the multiplication strategy above, introduce this method before you show students the traditional method of "long division." If you introduce the standard algorithm too early, there is the danger of kids learning the "dance steps" without understanding the concept. This is setting them up for failure down the road. I encourage you to watch the video, as the method is easier to understand when you see it in action. Good luck!
0 Comments
  More and more I'm becoming convinced that the way to get kids to understand (really, thoroughly, completely) is to get them to communicate their thinking. All of the professional development I've had the opportunity to take during my year and a half as Numeracy Lead Teacher has pointed me in that direction.
At a workshop this week, the participants were asked to look specifically at three of the six goals that our province has set out for mathematics instruction, which are:
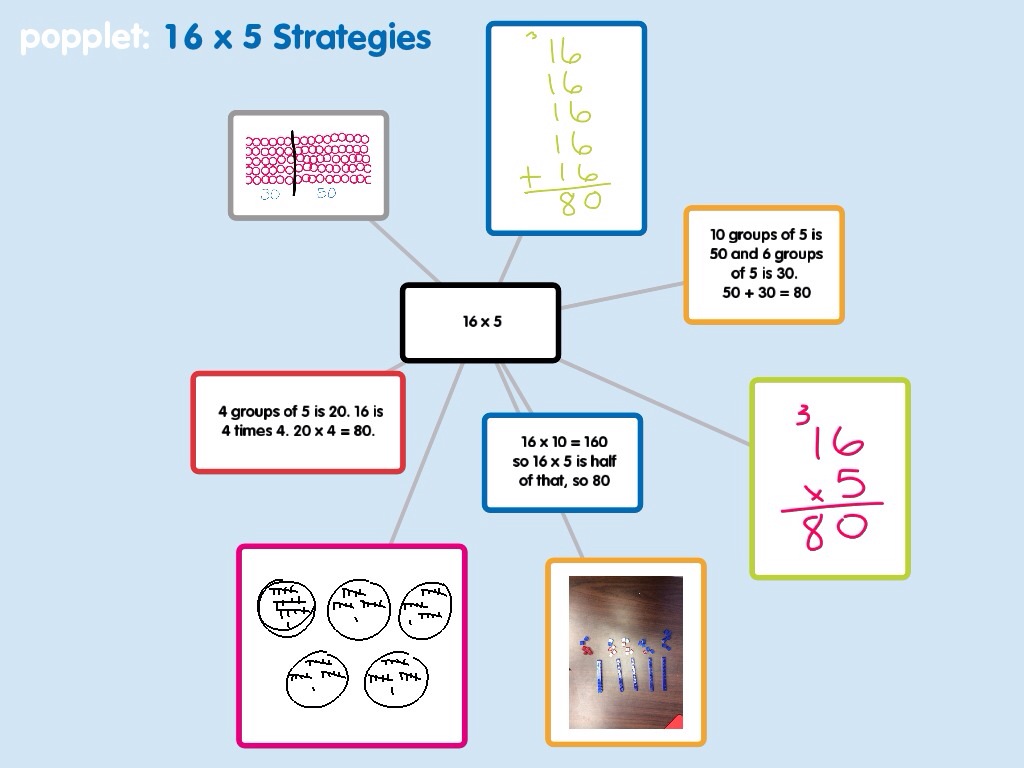
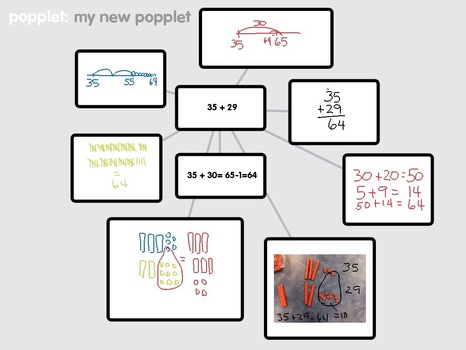
One activity to meet these goals would be to simply arrange the students into small groups or pairs, and ask them to list all of the ways they can think of to solve a mathematical equation. I'd like to take it a step further and ask them to use technology to gather and sort their ideas. Once they're convinced they've got all the ways they can think of, have them present their ideas to the rest of the class. In the picture above, I've used the app Popplet to record some possible ideas students may generate. Once the popplet is created, it can be shared through the iPad and an LCD projector, or saved as an image or pdf and emailed to the teacher, or saved to Dropbox. The last step could be to make a list of all the strategies the students have discovered as a whole class and sort them by least efficient to most efficient. There's sure to be some good debate going on there! Communicating, reasoning, efficiency, mathematical literacy and thinking critically, while integrating mathematics and technology. What a lesson! And all from one equation.  Math Inquiry is a classroom strategy that I've modelled several times for the teachers in our division. I've heard many different ways to use it with students, but here is how I use it in a Gr. 1-4 classroom. Photo credit: 123RF
For older students (Gr. 5-8) I spread out the process over a few days. Here is the variation:
Depending on the number of students, and the richness of the problem, Math Inquiry for older students may take from 2-4 days. 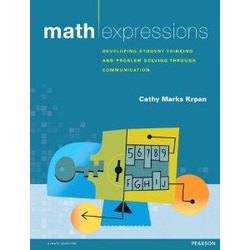 One of the best resources I have for Math Inquiry is Math Expressions: Developing Student Thinking and Problem Solving Through Communication by Cathy Marks Krpan.
 I love my iPad in the classroom (in case you haven't heard that from me before)! It's useful in such a wide variety of ways, but the best part about it is the ability to create with it. Creating is pretty high up on Bloom's Taxonomy (the Langwitches Blog has an awesome infographic of Bloom's and iPad apps), and is definitely how we should be using the iPads if we're lucky enough to have them in the classroom. The picture to the left was created with the Thinglink app (free!). The picture was taken in a Grade 8 math class where I did a lesson a few weeks ago based on the sugar content in drinks. It was a fun lesson to do. The students were asked to bring in their favourite drink and rank them according to their opinion of least healthy to most healthy. Then we examined the nutrition labels on the back and determined the amount of sugar in each drink. This was the difficult part, as not all labels are created equally, as many of you know. Some labels indicated the amount of sugar in the drink, but some indicated the amount of sugar in one serving size of the drink, which was less than the container held. That's where the math came in to play! Then we re-ranked them according to sugar content, and added interactive buttons using Thinglink. To use Thinglink, a photo is uploaded into the app. Then you tap the screen to add interactive items, such as a YouTube video, text or another picture. The red dots are tapped to open them, which gives more information than the photo does. Click here to see how this photo has become interactive. Once the project is complete, it is saved, and then easily shared via email or social media. Wouldn't it be cool to email the link to parents, or add to your class or school blog or website?  I introduced Skitch to my blog followers a few days ago when I wrote about some of my favourite apps. The photo to the left was uploaded into the Skitch app, and then students easily marked it up with arrows and labels. Skitch, which belongs to the Evernote family of apps, also allows other shapes and drawings to be included. Great for students to share new knowledge. The picture below shows some of the options available with the app. One of my favourite tools is the blurring tool (at the top of the options). This is awesome for publishing pictures of students online if you don't have permission to show students' faces. Simply blur the faces, and they are virtually unrecognizable!  Under the blur tool, is the undo/redo tool. Under that is the drawing tool, which allows you to make line drawings of any type. Next is the shape tool, which allows the inclusion of lines, rectangles and circles. The next tool is the labelling tool, which opens the keyboard. The final tool is the arrows.  The last picture shows the various colours available with this app, as well as thickness.
This app is so easy to use! Students catch on extremely quickly. And the best part? It's free too!  So, what are QR Codes, you ask? Well, you know what barcodes are, like when you buy something at the store and the clerk scans a code to enter the item and amount into the till? The QR (Quick Response) Code is kind of like that, except that it offers much more information. Quite often the QR Code will give you a link to a website, or a text message, image, etc. To read the QR Code, you need to install a QR Code Reader onto your device. There are many available for free. I like using i-nigma, seen below. Simply open the app, point it at a QR Code and your device will do the rest. Try it with the code above. It should take you back to this blog.  Here's how to make a QR Code. 1. Go to the website you want the QR Code to send people to. Right click to copy the website address. 2. Go to a QR Code Generator site. Again, there are so many out there. For simple QR Codes, like ones that link to a website, or offer text, I like goQR.me, which is free, and you don't need an account. 3. Click "url," and paste the website address into the box. Then click enter. 4. The QR Code will be shown at the right of the screen. Simply right click on the image, and select either copy image or save as, depending on how you wish to use it. 5. That's it. Easy peasy! OK, that's all fine and dandy, but why would I want to make a QR Code? How can I use this in my classroom? Well, that's a very good question! :) Here's an awesome YouTube video I came across as I was researching this question. It's only 2 minutes long, and worth a watch! So, there's one way to use QR Codes in the classroom - to link to Book Trailers! I absolutely LOOOOOVE this idea, and want to try it out very soon! Here are some other ways to use QR Codes with your students:
Some common problems with QR Codes are when the code becomes unreadable, likely if it's been crumpled or torn, or if the lighting is too poor. Don't laminate the codes, as the shine also makes them difficult for a device to read. If a website address is very long, it makes the QR Code very dense, and slows down the response time. To correct this problem, use a url shortener site like bitly.com. There are just so many great ideas out there! What's more, QR Codes are easy and free to create, portable, and there's a coolness factor to them that really grabs kids (and adults too!). It saves paper, and time too! |
Lori EmilsonTravelling Curriculum Support Teacher Archives
April 2017
Categories
All
|
 RSS Feed
