 I love my iPad in the classroom (in case you haven't heard that from me before)! It's useful in such a wide variety of ways, but the best part about it is the ability to create with it. Creating is pretty high up on Bloom's Taxonomy (the Langwitches Blog has an awesome infographic of Bloom's and iPad apps), and is definitely how we should be using the iPads if we're lucky enough to have them in the classroom. The picture to the left was created with the Thinglink app (free!). The picture was taken in a Grade 8 math class where I did a lesson a few weeks ago based on the sugar content in drinks. It was a fun lesson to do. The students were asked to bring in their favourite drink and rank them according to their opinion of least healthy to most healthy. Then we examined the nutrition labels on the back and determined the amount of sugar in each drink. This was the difficult part, as not all labels are created equally, as many of you know. Some labels indicated the amount of sugar in the drink, but some indicated the amount of sugar in one serving size of the drink, which was less than the container held. That's where the math came in to play! Then we re-ranked them according to sugar content, and added interactive buttons using Thinglink. To use Thinglink, a photo is uploaded into the app. Then you tap the screen to add interactive items, such as a YouTube video, text or another picture. The red dots are tapped to open them, which gives more information than the photo does. Click here to see how this photo has become interactive. Once the project is complete, it is saved, and then easily shared via email or social media. Wouldn't it be cool to email the link to parents, or add to your class or school blog or website? 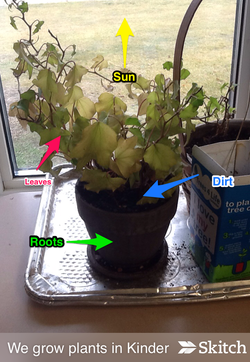 I introduced Skitch to my blog followers a few days ago when I wrote about some of my favourite apps. The photo to the left was uploaded into the Skitch app, and then students easily marked it up with arrows and labels. Skitch, which belongs to the Evernote family of apps, also allows other shapes and drawings to be included. Great for students to share new knowledge. The picture below shows some of the options available with the app. One of my favourite tools is the blurring tool (at the top of the options). This is awesome for publishing pictures of students online if you don't have permission to show students' faces. Simply blur the faces, and they are virtually unrecognizable!  Under the blur tool, is the undo/redo tool. Under that is the drawing tool, which allows you to make line drawings of any type. Next is the shape tool, which allows the inclusion of lines, rectangles and circles. The next tool is the labelling tool, which opens the keyboard. The final tool is the arrows. 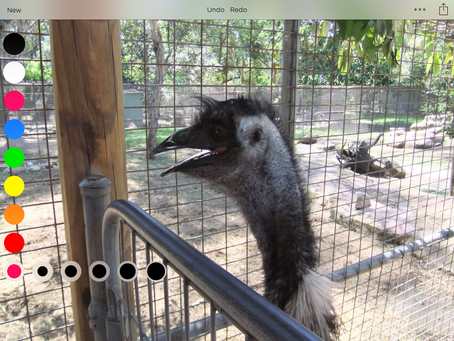 The last picture shows the various colours available with this app, as well as thickness.
This app is so easy to use! Students catch on extremely quickly. And the best part? It's free too!
0 Comments
Leave a Reply. |
Lori EmilsonTravelling Curriculum Support Teacher Archives
April 2017
Categories
All
|
 RSS Feed
